Top Qs
Timeline
Chat
Perspective
Battle of the Bismarck Sea order of battle
From Wikipedia, the free encyclopedia
Remove ads
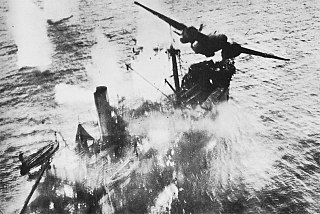
The Battle of the Bismarck Sea (2–4 March 1943) took place in the South West Pacific Area (SWPA) during World War II.
At midnight 28 February 1942, eight transports carrying about 6,900 troops of the Imperial Japanese Army, escorted by eight destroyers of the Imperial Japanese Navy, departed their base at Rabaul, New Britain heading for Lae, New Guinea. Through the afternoon of 1 March, the overcast weather held at which point the weather changed direction and the slow-moving task force was spotted by an Allied scout plane.
Aircraft of the U.S. 5th Air Force and the Royal Australian Air Force (RAAF) attacked the convoy, sinking all eight transports and four of the eight destroyers. The remaining destroyers with about 2,700 surviving troops limped back to Rabaul.
Remove ads
Japanese forces
Summarize
Perspective


- Transports[1]
Captain Kamataro Matsumoto
- Embarked units
- Army[2]
- Eighteenth Army Headquarters[a]
- Eighteenth Army Signals
- 51st Division Headquarters
- 51st Division Signals
- 51st Engineer Regiment
- 14th Artillery Regiment
- 115th Infantry Regiment
- 3rd Field Hospital
- 21st Artillery Brigade
- 50th Antiaircraft Battalion
- 15th Independent Engineer Regiment
- 22nd Airfield Battalion
- 209th Airfield Regiment
- 5th Air Signals Regiment
- 8th Shipping Engineer Regiment
- 3rd Company, 5th Shipping Engineer Regiment
- 3rd Disembarkation Unit
- Navy[3]
- Yokosuka 3rd Naval Air Defence Unit
- Yokosuka 5th Special Naval Landing Party
- Maizuru 2nd Special Naval Landing Party
- Screen[4]

Rear Admiral Kimura
- 8 destroyers
- 2 Kagerō-class (6 × 5-in. main battery)
- Tokitsukaze (Commander Masayoshi Motokura) (sunk)
- Yukikaze (Commander Ryokichi Sugama)
- 3 Asashio-class (6 × 5-in. main battery)
- 3 Fubuki-class (6 × 5-in. main battery)
- Shikinami (Lt. Commander Akifumi Kawahashi)
- Shirayuki (Commander Rokuro Sugawara) (sunk)
- Uranami (Lt. Commander Chikara Hagio)
- 2 Kagerō-class (6 × 5-in. main battery)
- Air units
- Navy[5][failed verification]
- Army[6]
- 1st Flying Group (1st Hikō Sentai)
- 11th Flying Group (11th Hikō Sentai)
Remove ads
Allied forces
Summarize
Perspective
Allied air forces
- Commander, Allied Air Forces, Southwest Pacific Area/US Fifth Air Force
- Lieutenant General George C. Kenney
- Advanced Echelon, Allied Air Forces
- Major General Ennis C. Whitehead
RAAF


- No. 73 Wing RAAF (Wing Commander Blake Pelly)[7]
- No. 6 Squadron RAAF (Wing Commander A. A. Barlow)
- No. 22 Squadron RAAF (Wing Commander Keith Hampshire)
- No. 30 Squadron RAAF (Wing Commander B. R. Walker)
- Wards Airfield: Bristol Beaufighter[8][10]
- No. 71 Wing RAAF (Wing Commander Ian McLachlan)[12]
- No. 75 Squadron RAAF (Squadron Leader W. S. Arthur)
- No. 100 Squadron RAAF (Squadron Leader J. A. Smilbert (acting))
- Gurney Airfield: Bristol Beaufort[8][10]
USAAF


- 35th Fighter Group (Colonel Richard A. Legg)[8]
- 39th Fighter Squadron (Captain T. J. Lynch)[8][10]
- 40th Fighter Squadron (Captain Malcolm A. Moore)[8][10]
- 49th Fighter Group (Lieutenant Colonel R. L. Morrissey)[8]
- 7th Fighter Squadron (Major William P. Martin)[8][10]
- 8th Fighter Squadron (Major Mitchell E. Sims)[8][10]
- Kila Airfield: P-40 Warhawk
- 9th Fighter Squadron (Captain Jesse C. Peaslee)[8][10]
- Schwimmer Airfield: P-38 Lightning
- 3rd Attack Group (Lieutenant Colonel R. F. Strickland)[8]
- 13th Attack Squadron (Major Harold V. Maull)[8][10]
- Schwimmer Airfield: B-25 Mitchell
- 89th Attack Squadron (Major Glen W. Clark)[8][10]
- Kila Airfield: A-20 Havoc
- 90th Attack Squadron (Major Edward L. Larner)[8][14]
- Durand Airfield: B-25 Mitchell
- 13th Attack Squadron (Major Harold V. Maull)[8][10]
- 38th Bombardment Group (Colonel Fay R. Upthegrove)[8]
- 71st Bombardment Squadron (Major Eugene P. Mussett)[8][10]
- Durand Airfield: B-25 Mitchell
- 405th Bombardment Squadron (Lieutenant Colonel Millard Lewis)[8][10]
- Durand Airfield: B-25 Mitchell
- 71st Bombardment Squadron (Major Eugene P. Mussett)[8][10]
- 43rd Bombardment Group (Colonel Roger M. Ramey)[8]
- 63rd Bombardment Squadron (Major Edward W. Scott)[8][10]
- 64th Bombardment Squadron (Major Kenneth D. McCullar)[8][10]
- Jacksons Airfield: B-17 Flying Fortress
- 65th Bombardment Squadron (Major Harray J. Hawthorne)[8][10]
- Jacksons Airfield: B-17 Flying Fortress
- 403rd Bombardment Squadron (Major Jay P. Reusek)[8][10]
- Mareeba Airfield: B-17 Flying Fortress
- 90th Bombardment Group (Colonel Ralph E. Koon)[8]
- 319th Bombardment Squadron (Captain Charles E. Jones)[8][15]
- Jacksons Airfield: B-24 Liberator
- 320th Bombardment Squadron (Major Roy L. Taylor)[8][16]
- Jacksons Airfield: B-24 Liberator
- 321st Bombardment Squadron (Major Cecil L. Faulkner)[8][17]
- Jacksons Airfield: B-24 Liberator
- 400th Bombardment Squadron (Major Harry J. Bullis)[8]
- Jacksons Airfield: B-24 Liberator
- 8th Photo Reconnaissance Squadron (1st Lieutenant F. S. Savage)[8][18]
- Kila Airfield: F-4 Lightning, F-5 Lightning
- 319th Bombardment Squadron (Captain Charles E. Jones)[8][15]
Motor Torpedo Boat Striking Force

Lieutenant Commander Barry K. Atkins[19]
- Early Type (77 feet, 4 × 18-in. torpedo tubes)
- PT-66 (Lieutenant (jg) William C. Quinby)
- PT-67 (Ensign James W. Emmons)
- PT-68 (Lieutenant (jg) Robert L. Childs)
- Elco Type (80 feet, 4 × 21-in. torpedo tubes)
- PT-121 (Ensign Edward R. Bergin)
- PT-128 (Ensign James W. Herring)
- PT-143 (Lieutenant (jg) John S. Bayliss)
- PT-149 (Lieutenant William J. Flittie)
- PT-150 (Lieutenant (jg) Russell E. Hamacheck)
Remove ads
Notes
References
Bibliography
Wikiwand - on
Seamless Wikipedia browsing. On steroids.
Remove ads